I’ve been renovating for the last 2 decades now and I always love the transformation of a new space OR an entire home! There’s such satisfaction when you look back at the before and after photos!
We started on this adventure nearly 2 years ago, getting prices and quotes for a variety of renovation projects throughout the home. And then the project list kept growing and growing (if you’ve not done a renovation, it’s important to think through ALL the things that will
Planning Your Renovation: Costs and Considerations
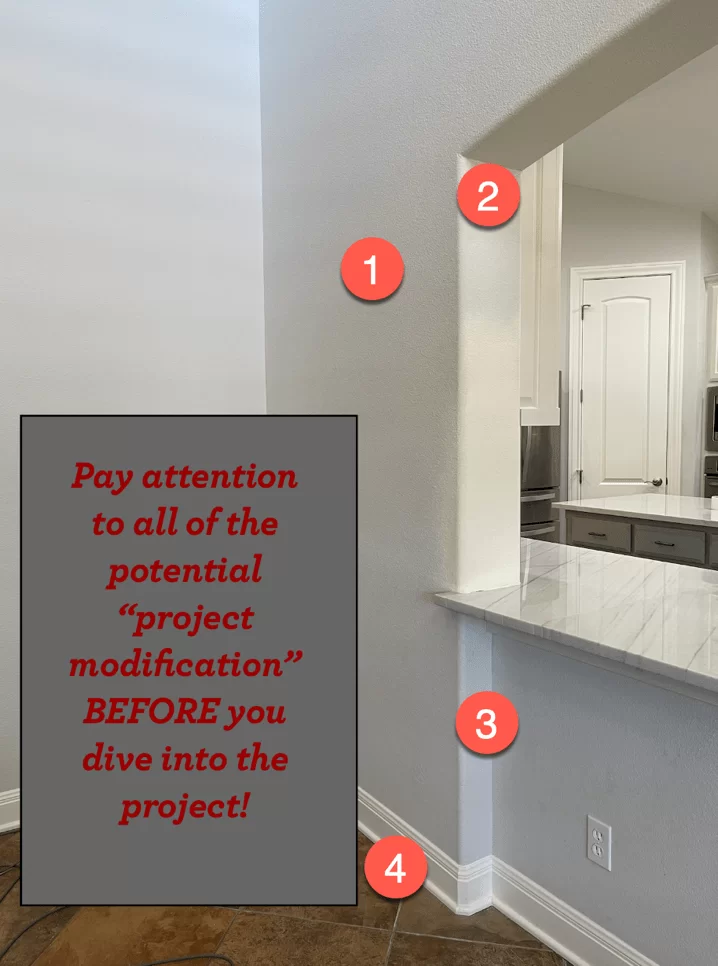
For instance, we wanted to take down this wall to open up the space into the kitchen. In order to do that, we’d have to decide what to do with the walls and baseboards.
- Wanted to knocks out the wall to open up the living area and the kitchen.
- Would have to address this wall and the depth since the arch width was set. There are other considerations with regard to matching the other side of the room and would have required us to keep about 1 foot of wall, thus further reducing our visual impact.
- About 6” of space that would have to be leveled or the wall to the right would have to extend out 6”.
- Modification would require all new baseboards since these are no longer available.
In the end, we felt that “benefit” did not outweigh the cost and decided to stick with the wall as is.
Tackle One Project at A time
Fast-forward… and after a year of delays, we finally got our new range in. (We ordered it back in the summer of 2022 and arrived at the end of July 2023!)
TIP: Since the range is built into the granite, we held off on other appliances in case we needed to change the brand since the others were easier to find and that part wasn’t critical to the countertop remodel.
With 16 days left before school and one week of camp, we decided to pull off one end of summer renovation project! It was supposed to be one week, start to finish, but wound up being 2 before everything was 100% signed sealed and delivered J.
That being said, we were eager to get it done before things got crazy.
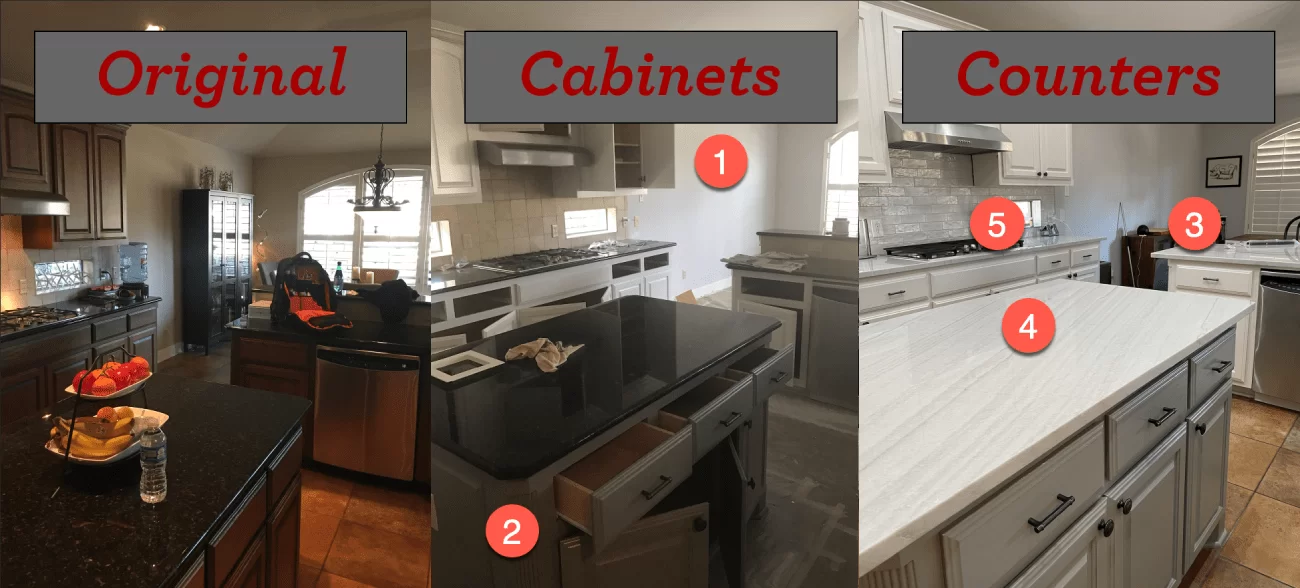
But to see the complete transformation… let’s look back to what it looked like when we bought in February of 2017.
Everything was dark and beige, from top to bottom. We had the cabinets and walls (and virtually every other paintable surface in the home) painted a light and bright color.
HUGE improvement…

Fast forward to 2023, it was time to do the counters and backsplash. You can see through each phase, how much lighter and brighter everything looks. Lighting is the same across all three photos!
Changes included:
- Builder’s beige walls (and ceilings AND baseboards) were lightened up with a light gray color.
- Brown cabinets and doors were painted (a shade of white on the main cabinets and a pewter gray on the island).
- Dropped the “bar height” counters down to counter height.
- Changed the “Uba Tuba” granite to a white quartzite.
- Beige tumbled stone backsplash replaced with a white textured/iridescent tile to add an elegant touch with a modern feel!
Timeline and Scheduling: Managing Contractors and Subcontractors
The project started on a Monday. Counters were to be in Friday and tile done over the weekend. Tile was delayed by approximately a week due to drywall repairs that were necessary for the walls where the previous backsplash was installed.
Kitchen Counter and Backsplash Renovation: Step by Step
- Determine the scope of work and how you will handle the inconvenience if it’s going to be in your primary residence.
DIY or Hire a Professional?
- Decide if you want to manage the project yourself or not.
- Research materials (granite, quartz, quartzite, marble, etc.).
- Get samples of tiles (Home Depot, Lowes, Floor and Décor, the Tile Shop, Prosource, etc.) and look at samples of counters at various show rooms.
- Call for estimates/bids.
NOTE: You can expect to pay 20-30% to a general contractor if you’ll be having someone manage the project. If you’re hiring a designer to help with selections, that could increase further.
TIP: Decide if you want to do anything on your own, such as touch up paint, for example. This can save time and money and you may already have paint available for touchups.
- Determine the timeline (and add 50% more for completion).
- Choose your contractors (you’ll need a general handyman, demo, painter who can texture, plumber, electrician, tile installer, granite fabricator and installer).
- Schedule the project and all the subcontractors, if handling and plan for the inconvenience (get paper goods, plan meals out, plan to use the grill, etc.)
TIP: Before the project starts, empty all cabinets and take out all drawers (this is a GREAT time for a mini declutter/organizing project).
- Pay any required deposits (I prefer to pay for materials only and labor as a draw or as milestones are completed).
- Stay on top of the project!
At the end, if you’re managing subcontractors yourself, you will need an electrician for any electric that has been modified and a plumber to reinstall the dishwasher, garbage disposal, sink, (and stove, if gas) unless you have the personal handy skills to do any or all of those tasks!
Final Touches and Lessons Learned from Two Decades of Experience
Keep in mind that every one of the projects I’ve EVER done has gone beyond the original plan! So as long as you set the right expectations, you’ll be okay! Things WILL come up!
For instance, when they leveled the counters, they found a plumbing vent that was a foot too high for the new counter height and required a plumber to come out and fix before we could continue!
The most important part is to have fun and keep the end goal in mind.
Ready to transform your kitchen into your dream space? Don’t navigate the complex world of renovations alone! I’ve been investing personally and helping homeowners in Austin (and Florida) make big impacts with small improvements for over 20 years.
Contact me today for a free consultation, and let’s make your vision come to life.


